
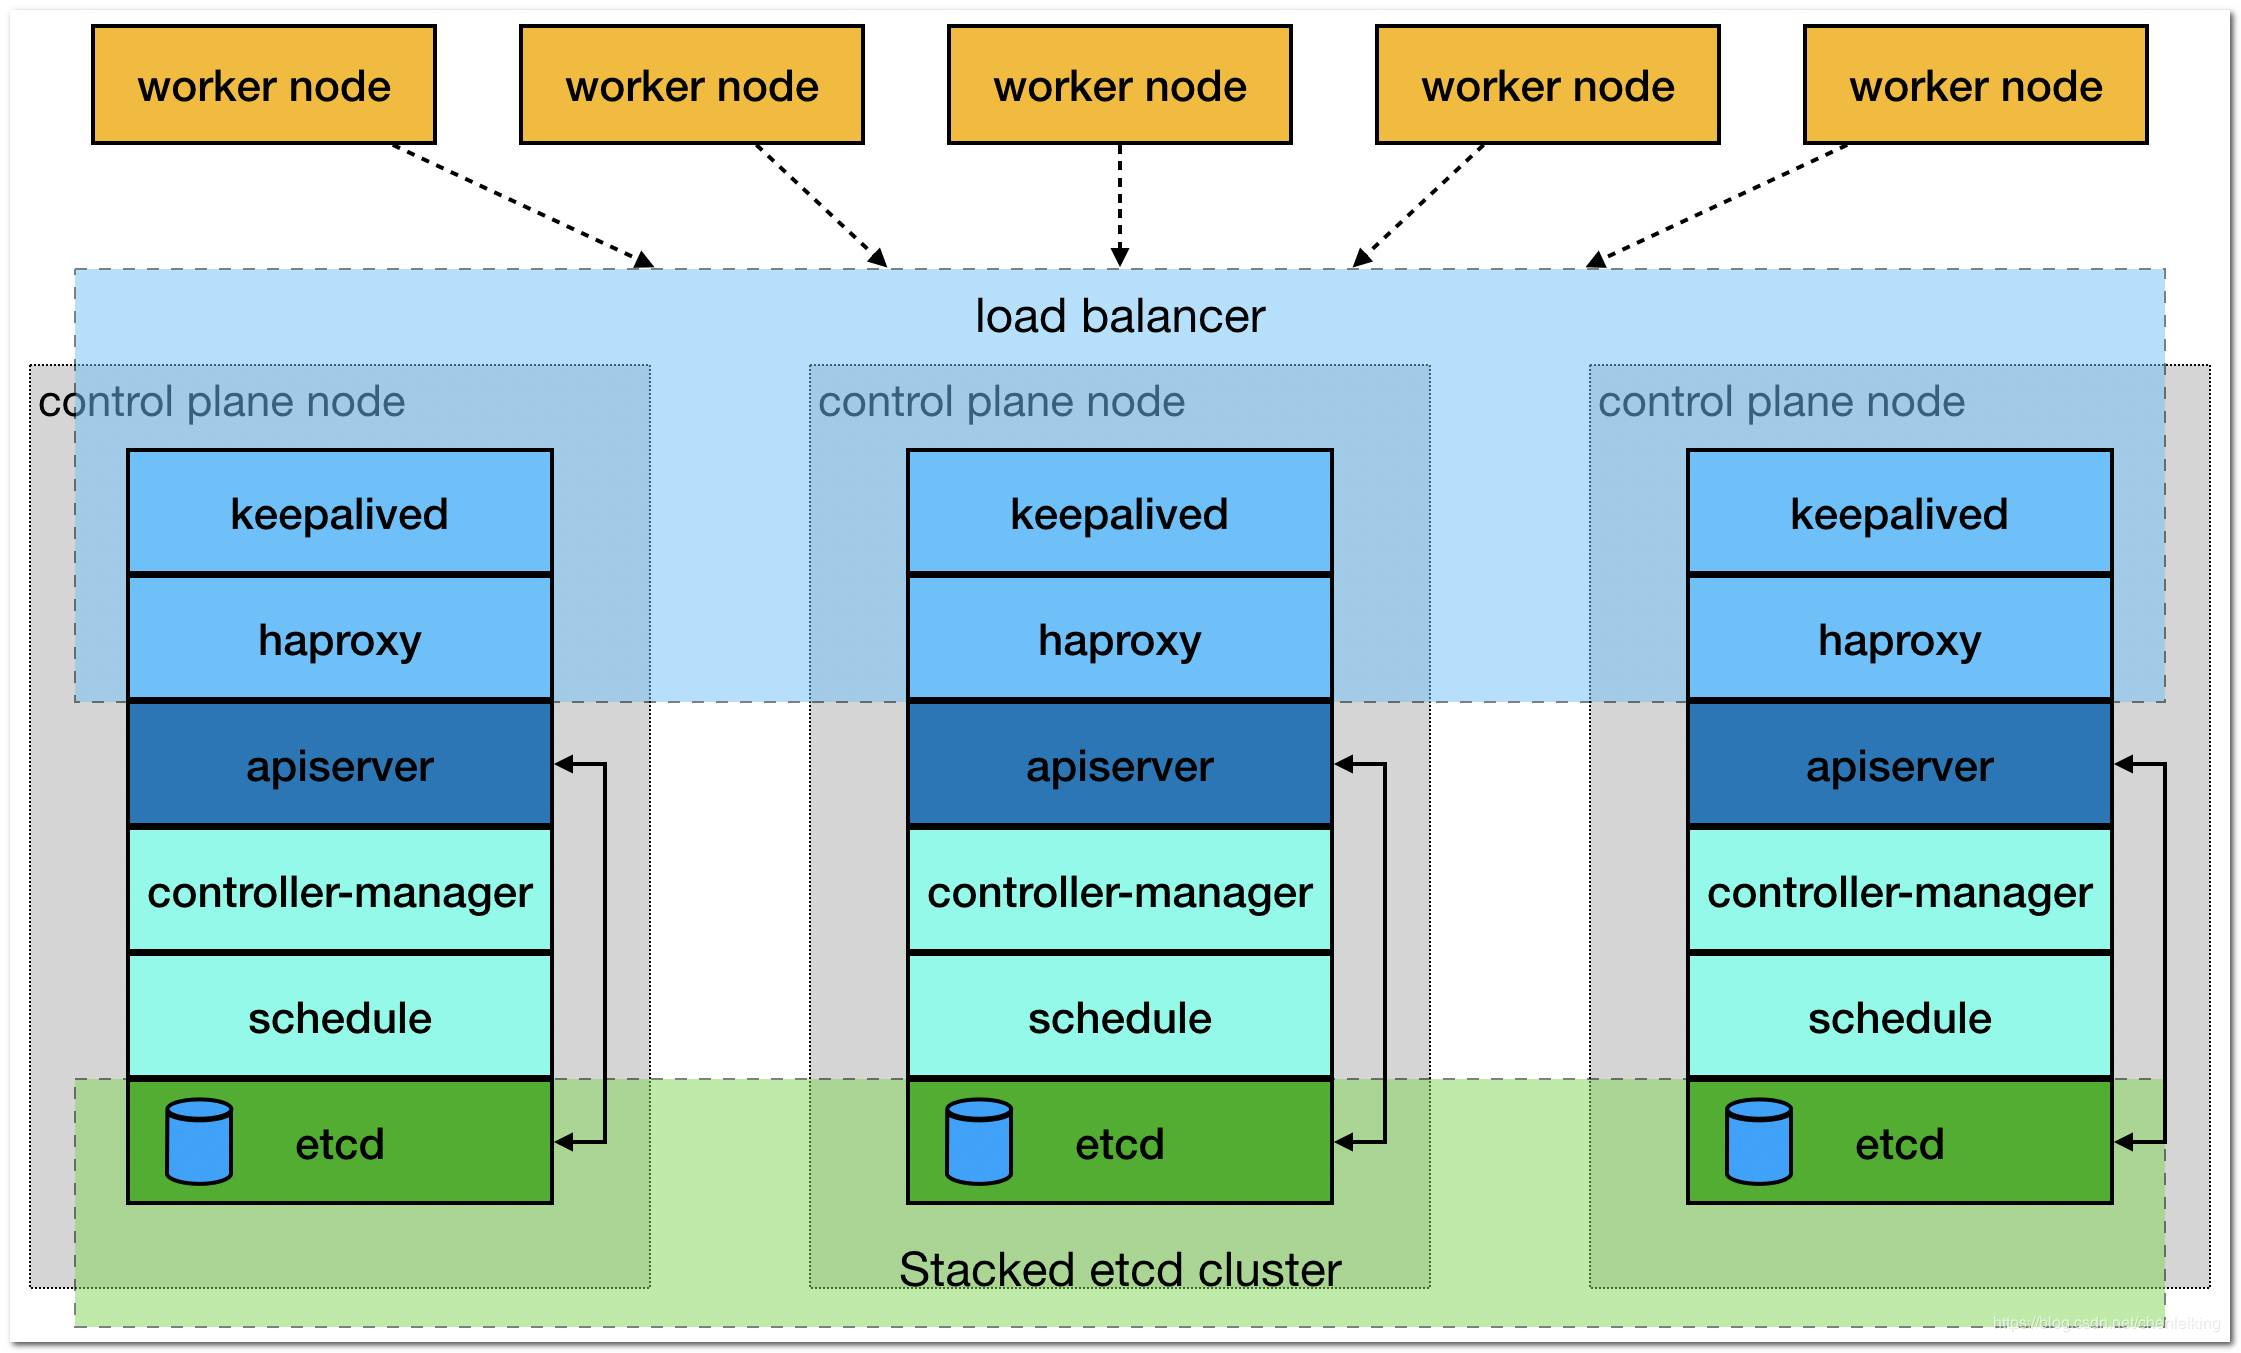
基础环境
k8s 集群
worker1 10.0.8.6 centos8
worker2 10.0.8.12 centos8
vip 10.0.8.100
etcd 集群
172.21.16.14
172.21.16.6
172.21.16.13
通用配置
设置主机名
hostnamectl set-hostname 主机名
配置 hosts 文件并同步
vim /etc/hosts
10.0.8.6 worker1
10.0.8.12 worker2

172.21.16.14 ceph1
172.21.16.6 ceph2
172.21.16.13 ceph3
关闭防火墙
systemctl stop firewalld && systemctl disable firewalld
关闭各节点SElinux
sudo setenforce 0
sudo sed -i 's/^SELINUX=enforcing$/SELINUX=permissive/' /etc/selinux/config
关闭 swap
swapoff -a
sed -i 's/.*swap.*/#&/' /etc/fstab
keepalived
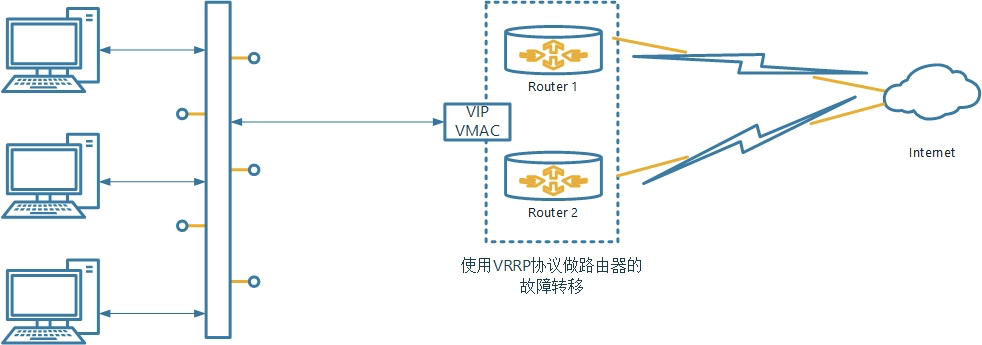
安装
yum -y install haproxy keepalived
配置
worker1
cat /etc/keepalived/keepalived.conf
! Configuration File for keepalived

global_defs {
   # 路由器标识,一般不用改,也可以写成每个主机自己的主机名
   router_id LVS_DEVEL

   # 添加如下内容
   script_user root
   enable_script_security
}

# 定义用于实例执行的脚本内容,比如可以在线降低优先级,用于强制切换
vrrp_script check_haproxy {
    script "/etc/keepalived/check_haproxy.sh"    # 检测脚本路径
    interval 3
    weight -2
    fall 10
    rise 2
}

vrrp_instance VI_1 {
    # 指定该节点为主节点,备用节点设置为BACKUP
    state MASTER
    # 绑定虚拟IP的网络接口
    interface eth0
    # VRRP组名,两个节点设置一样,以指明各个节点同属一VRRP组
    virtual_router_id 51
    mcast_src_ip 10.0.8.6
    # 主节点的优先级,数值在1~254,注意从节点必须比主节点的优先级别低
    priority 100
    # 组播信息发送间隔,两个节点需一致
    advert_int 1
    # 设置验证信息,两个节点需一致
    authentication {
        auth_type PASS
        auth_pass 1111
    }
    # 指定虚拟IP,两个节点需设置一样
    virtual_ipaddress {
        10.0.8.100
    }
    # 用于追踪脚本,执行 vrrp_script
    track_script {
        check_haproxy
    }

}
worker2
cat /etc/keepalived/keepalived.conf
! Configuration File for keepalived

global_defs {
   router_id LVS_DEVEL

   # 添加如下内容
   script_user root
   enable_script_security
}

vrrp_script check_haproxy {
    script "/etc/keepalived/check_haproxy.sh"    # 检测脚本路径
    interval 3
    weight -2
    fall 10
    rise 2
}

vrrp_instance VI_1 {
    state BACKUP  # BACKUP
    interface eth0
    virtual_router_id 51
    mcast_src_ip 10.0.8.12
    priority 50
    advert_int 1
    authentication {
        auth_type PASS
        auth_pass 1111
    }
    virtual_ipaddress {
        10.0.8.100  # 虚拟IP
    }
    track_script {
        check_haproxy       # 用于追踪脚本,执行 vrrp_script
    }
}
检查脚本
cat /etc/keepalived/check_haproxy.sh
#!/bin/sh
# HAPROXY down
A=`ps -C haproxy --no-header | wc -l`
if [ $A -eq 0 ]
then
  systmectl start haproxy
  if [ ps -C haproxy --no-header | wc -l -eq 0 ]
  then
    killall -9 haproxy
    echo "HAPROXY down"
    sleep 3600
  fi
fi
增加执行权限
chmod +x check_haproxy.sh
haproxy
安装
yum -y install haproxy keepalived
配置
worker1
cat /etc/haproxy/haproxy.cfg
#---------------------------------------------------------------------
# Example configuration for a possible web application.  See the
# full configuration options online.
#
#   https://www.haproxy.org/download/1.8/doc/configuration.txt
#
#---------------------------------------------------------------------

#---------------------------------------------------------------------
# Global settings
#---------------------------------------------------------------------
global
    # to have these messages end up in /var/log/haproxy.log you will
    # need to:
    #
    # 1) configure syslog to accept network log events.  This is done
    #    by adding the '-r' option to the SYSLOGD_OPTIONS in
    #    /etc/sysconfig/syslog
    #
    # 2) configure local2 events to go to the /var/log/haproxy.log
    #   file. A line like the following can be added to
    #   /etc/sysconfig/syslog
    #
    #    local2.*                       /var/log/haproxy.log
    #
    log         127.0.0.1 local2

    chroot      /var/lib/haproxy
    pidfile     /var/run/haproxy.pid
    maxconn     4000
    user        haproxy
    group       haproxy
    daemon

    # turn on stats unix socket
    stats socket /var/lib/haproxy/stats

    # utilize system-wide crypto-policies
    ssl-default-bind-ciphers PROFILE=SYSTEM
    ssl-default-server-ciphers PROFILE=SYSTEM

#---------------------------------------------------------------------
# common defaults that all the 'listen' and 'backend' sections will
# use if not designated in their block
#---------------------------------------------------------------------
defaults
    mode                    http
    log                     global
    option                  httplog
    option                  dontlognull
    option http-server-close
    option forwardfor       except 127.0.0.0/8
    option                  redispatch
    retries                 3
    timeout http-request    10s
    timeout queue           1m
    timeout connect         10s
    timeout client          1m
    timeout server          1m
    timeout http-keep-alive 10s
    timeout check           10s
    maxconn                 3000

#---------------------------------------------------------------------
# main frontend which proxys to the backends
#---------------------------------------------------------------------
frontend kubernetes-apiserver
    mode             tcp
    bind             *:16443
    option           tcplog
    default_backend  kubernetes-apiserver

#---------------------------------------------------------------------
# static backend for serving up images, stylesheets and such
#---------------------------------------------------------------------
listen stats
    bind            *:1080
    stats auth      admin:awesomePassword
    stats refresh   5s
    stats realm     HAProxy\ Statistics
    stats uri       /admin?stats

#---------------------------------------------------------------------
# round robin balancing between the various backends
#---------------------------------------------------------------------
backend kubernetes-apiserver
    mode        tcp
    balance     roundrobin
    server      worker1 10.0.8.6:6443  check
    server      worker2 10.0.8.12:6443 check
worker2
配置同 worker1
启动 keepalive 和 haproxy
systemctl start keepalived && systemctl enable keepalived
systemctl start haproxy && systemctl enable haproxy
查看vip IP地址
ip addr show eth0
3: eth0: <BROADCAST,MULTICAST,UP,LOWER_UP> mtu 1500 qdisc mq state UP group default qlen 1000
    link/ether 52:54:00:a4:32:6f brd ff:ff:ff:ff:ff:ff
    inet 10.0.8.6/22 brd 10.0.11.255 scope global noprefixroute eth0
       valid_lft forever preferred_lft forever
    inet 10.0.8.100/32 scope global eth0
       valid_lft forever preferred_lft forever
    inet6 fe80::5054:ff:fea4:326f/64 scope link
       valid_lft forever preferred_lft forever
配置外部 etcd 集群
安装 cfssl
wget https://github.com/cloudflare/cfssl/releases/download/v1.6.0/cfssl_1.6.0_linux_amd64
wget https://github.com/cloudflare/cfssl/releases/download/v1.6.0/cfssljson_1.6.0_linux_amd64

chmod +x cfssl_1.6.0_linux_amd64 cfssljson_1.6.0_linux_amd64

mv cfssl_1.6.0_linux_amd64 /usr/local/bin/cfssl
mv cfssljson_1.6.0_linux_amd64 /usr/local/bin/cfssljson
安装 etcd
mkdir -p /data/etcd/bin

wget https://github.com/etcd-io/etcd/releases/download/v3.5.0/etcd-v3.5.0-linux-amd64.tar.gz

tar zxvf etcd-v3.5.0-linux-amd64.tar.gz
cd etcd-v3.5.0-linux-amd64
mv etcd etcdctl /data/etcd/bin/
创建证书
创建ca证书,客户端,服务端,节点之间的证书
Etcd属于server ,etcdctl 属于client,二者之间通过http协议进行通信。
ca证书 自己给自己签名的权威证书,用来给其他证书签名
server证书 etcd的证书
client证书 客户端,比如etcdctl的证书
peer证书 节点与节点之间通信的证书
创建目录
mkdir -p /data/etcd/ssl
cd /data/etcd/ssl
创建ca证书
vim ca-config.json
{
    "signing": {
        "default": {
            "expiry": "438000h"
        },
        "profiles": {
            "server": {
                "expiry": "438000h",
                "usages": [
                    "signing",
                    "key encipherment",
                    "server auth",
                    "client auth"
                ]
            },
            "client": {
                "expiry": "438000h",
                "usages": [
                    "signing",
                    "key encipherment",
                    "client auth"
                ]
            },
            "peer": {
                "expiry": "438000h",
                "usages": [
                    "signing",
                    "key encipherment",
                    "server auth",
                    "client auth"
                ]
            }
        }
    }
}
server auth表示client可以用该ca对server提供的证书进行验证
client auth表示server可以用该ca对client提供的证书进行验证
创建证书签名请求ca-csr.json
vim ca-csr.json
{
    "CN": "etcd",
    "key": {
        "algo": "rsa",
        "size": 2048
    }
}
生成CA证书和私钥
cfssl gencert -initca ca-csr.json | cfssljson -bare ca
# ls ca*
# ca-config.json ca.csr ca-csr.json ca-key.pem ca.pem
生成客户端证书
vim client.json
{
    "CN": "client",
    "key": {
        "algo": "ecdsa",
        "size": 256
    }
}
生成
cfssl gencert -ca=ca.pem -ca-key=ca-key.pem -config=ca-config.json -profile=client client.json  | cfssljson -bare client -
# ls ca*
# ca-config.json ca.csr ca-csr.json ca-key.pem ca.pem client-key.pem client.pem
生成server,peer证书
vim etcd.json
{
    "CN": "etcd",
    "hosts": [
        "172.21.16.14",
        "172.21.16.6",
        "172.21.16.13"
    ],
    "key": {
        "algo": "ecdsa",
        "size": 256
    },
    "names": [
        {
            "C": "CN",
            "L": "BJ",
            "ST": "BJ"
        }
    ]
}
生成
cfssl gencert -ca=ca.pem -ca-key=ca-key.pem -config=ca-config.json -profile=server etcd.json | cfssljson -bare server

cfssl gencert -ca=ca.pem -ca-key=ca-key.pem -config=ca-config.json -profile=peer etcd.json | cfssljson -bare peer
同步证书
scp -r /data/etcd 172.21.16.6:/data/etcd
scp -r /data/etcd 172.21.16.13:/data/etcd
配置服务
vim /usr/lib/systemd/system/etcd.service
三台主机配置不一样用的时候把注释最好删除
[Unit]
Description=Etcd Server
After=network.target
After=network-online.target
Wants=network-online.target
Documentation=https://github.com/coreos

[Service]
Type=notify
WorkingDirectory=/data/etcd/
ExecStart=/data/etcd/bin/etcd \
  --name=etcd1 \      # 这里须要改
  --cert-file=/data/etcd/ssl/server.pem \
  --key-file=/data/etcd/ssl/server-key.pem \
  --peer-cert-file=/data/etcd/ssl/peer.pem \
  --peer-key-file=/data/etcd/ssl/peer-key.pem \
  --trusted-ca-file=/data/etcd/ssl/ca.pem \
  --peer-trusted-ca-file=/data/etcd/ssl/ca.pem \
  --initial-advertise-peer-urls=https://192.168.100.241:2380 \  # 改为本机ip
  --listen-peer-urls=https://172.21.16.14:2380 \  # 改为本机ip
  --listen-client-urls=https://172.21.16.14:2379 \  # 改为本机ip
  --advertise-client-urls=https://172.21.16.14:2379 \  # 改为本机ip
  --initial-cluster-token=etcd-cluster-0 \
  --initial-cluster=etcd1=https://172.21.16.14:2380,etcd2=https://172.21.16.6:2380,etcd3=https://172.21.16.13:2380 \
  --initial-cluster-state=new \
  --data-dir=/data/etcd \
  --snapshot-count=50000 \
  --auto-compaction-retention=1 \
  --max-request-bytes=10485760 \
  --quota-backend-bytes=8589934592
Restart=always
RestartSec=15
LimitNOFILE=65536
OOMScoreAdjust=-999

[Install]
WantedBy=multi-user.target
启动服务
systemctl daemon-reload
systemctl enable etcd
systemctl start etcd
systemctl status etcd
验证是否成功
etcdctl v3
cd /data/etcd/ssl
../bin/etcdctl --cacert=ca.pem --cert=server.pem --key=server-key.pem --endpoints="https://172.21.16.14:2379" endpoint health
查看集群状态
alias etcd-list='/data/etcd/bin/etcdctl --endpoints=https://etcd1:2379,https://etcd2:2379,https://etcd3:2379 --cacert=/data/etcd/ssl/ca.pem --cert=/data/etcd/ssl/server.pem --key=/data/etcd/ssl/server-key.pem --write-out=table member list'

alias etcd-status='/data/etcd/bin/etcdctl --endpoints=https://etcd1:2379,https://etcd2:2379,https://etcd3:2379 --cacert=/data/etcd/ssl/ca.pem --cert=/data/etcd/ssl/server.pem --key=/data/etcd/ssl/server-key.pem --write-out=table  endpoint status'

alias etcd-healthy='/data/etcd/bin/etcdctl --endpoints=https://etcd1:2379,https://etcd2:2379,https://etcd3:2379 --cacert=/data/etcd/ssl/ca.pem --cert=/data/etcd/ssl/server.pem --key=/data/etcd/ssl/server-key.pem --write-out=table endpoint health'
docker
https://docs.docker.com/engine/install/centos/
配置源
 sudo yum install -y yum-utils
 sudo yum-config-manager \
    --add-repo \
    https://download.docker.com/linux/centos/docker-ce.repo
卸载旧版本
sudo yum remove docker \
                  docker-client \
                  docker-client-latest \
                  docker-common \
                  docker-latest \
                  docker-latest-logrotate \
                  docker-logrotate \
                  docker-engine
安装
sudo yum install docker-ce docker-ce-cli containerd.io

sudo systemctl start docker
sudo systemctl enable docker
配置
vim /etc/docker/daemon.json
{
  "exec-opts": ["native.cgroupdriver=systemd"],
  "log-driver": "json-file",
  "log-opts": {
    "max-size": "100m"
  },
  "storage-driver": "overlay2"
}

systemctl restart docker
kubeadm 创建 k8s 集群
各节点安装ipset服务
yum -y install ipvsadm ipset sysstat conntrack libseccomp
配置内核参数
配置内核模块和设置内核参数
cat <<EOF | sudo tee /etc/modules-load.d/k8s.conf
br_netfilter
EOF

cat <<EOF | sudo tee /etc/sysctl.d/k8s.conf
net.bridge.bridge-nf-call-ip6tables = 1
net.bridge.bridge-nf-call-iptables = 1
net.ipv4.ip_forward = 1
net.ipv4.ip_nonlocal_bind = 1
fs.may_detach_mounts = 1
vm.panic_on_oom=0
fs.inotify.max_user_watches=89100
fs.file-max=52706963
fs.nr_open=52706963
net.netfilter.nf_conntrack_max=2310720
EOF
sudo sysctl --system
可选优化
net.ipv4.tcp_keepalive_time = 600
net.ipv4.tcp_keepalive_probes = 3
net.ipv4.tcp_keepalive_intvl =15
net.ipv4.tcp_max_tw_buckets = 36000
net.ipv4.tcp_tw_reuse = 1
net.ipv4.tcp_max_orphans = 327680
net.ipv4.tcp_orphan_retries = 3
net.ipv4.tcp_syncookies = 1
net.ipv4.tcp_max_syn_backlog = 16384
net.ipv4.ip_conntrack_max = 65536
net.ipv4.tcp_max_syn_backlog = 16384
net.ipv4.tcp_timestamps = 0
net.core.somaxconn = 16384
相关配置解释
Linux 绑定非本机 IP – net.ipv4.ip_nonlocal_bind
在 Linux 如果需要绑定本机不存在的 IP, 例如在 HAproxy 及 Nginx 可能会用到, 需要开启 Kernel 的参数 net.ipv4.ip_nonlocal_bind.
ipv4 及 ipv6 的 ip_nonlocal_bind 参数默认是关闭, 要检视目前的状态, 可以用以下指令:
sysctl net.ipv4.ip_nonlocal_bind
sysctl net.ipv6.ip_nonlocal_bind
panic_on_oom: 用来控制当内存不足时该如何做。
cat /proc/sys/vm/panic_on_oom
值为0:内存不足时,启动 OOM killer。
值为1:内存不足时,有可能会触发 kernel panic(系统重启),也有可能启动 OOM killer。
值为2:内存不足时,表示强制触发 kernel panic,内核崩溃GG(系统重启)。
加载 ipvs 相关模块
所有节点配置ipvs模块,在内核4.19+版本nf_conntrack_ipv4已经改为nf_conntrack, 4.18以下使用nf_conntrack_ipv4即可:
modprobe -- ip_vs
modprobe -- ip_vs_rr
modprobe -- ip_vs_wrr
modprobe -- ip_vs_sh
modprobe -- nf_conntrack
创建 /etc/modules-load.d/ipvs.conf 并加入以下内容:
cat >/etc/modules-load.d/ipvs.conf <<EOF
ip_vs
ip_vs_lc
ip_vs_wlc
ip_vs_rr
ip_vs_wrr
ip_vs_lblc
ip_vs_lblcr
ip_vs_dh
ip_vs_sh
ip_vs_fo
ip_vs_nq
ip_vs_sed
ip_vs_ftp
ip_vs_sh
nf_conntrack
ip_tables
ip_set
xt_set
ipt_set
ipt_rpfilter
ipt_REJECT
ipip
EOF
所有节点配置完内核后,重启服务器,保证重启后内核依旧加载
reboot
重启后结果如下代表正常:
lsmod | grep --color=auto -e ip_vs -e nf_conntrack
ip_vs_ftp              16384  0
nf_nat                 32768  1 ip_vs_ftp
ip_vs_sed              16384  0
ip_vs_nq               16384  0
ip_vs_fo               16384  0
ip_vs_sh               16384  0
ip_vs_dh               16384  0
ip_vs_lblcr            16384  0
ip_vs_lblc             16384  0
ip_vs_wrr              16384  0
ip_vs_rr               16384  0
ip_vs_wlc              16384  0
ip_vs_lc               16384  0
ip_vs                 151552  24 ip_vs_wlc,ip_vs_rr,ip_vs_dh,ip_vs_lblcr,ip_vs_sh,ip_vs_fo,ip_vs_nq,ip_vs_lblc,ip_vs_wrr,ip_vs_lc,ip_vs_sed,ip_vs_ftp
nf_conntrack          143360  2 nf_nat,ip_vs
nf_defrag_ipv6         20480  1 nf_conntrack
nf_defrag_ipv4         16384  1 nf_conntrack
libcrc32c              16384  4 nf_conntrack,nf_nat,xfs,ip_vs
安装 kubeadm
cat <<EOF > /etc/yum.repos.d/kubernetes.repo
[kubernetes]
name=Kubernetes
baseurl=https://mirrors.aliyun.com/kubernetes/yum/repos/kubernetes-el7-x86_64/
enabled=1
gpgcheck=1
repo_gpgcheck=1
gpgkey=https://mirrors.aliyun.com/kubernetes/yum/doc/yum-key.gpg https://mirrors.aliyun.com/kubernetes/yum/doc/rpm-package-key.gpg
EOF


setenforce 0
yum install -y kubelet kubeadm kubectl --disableexcludes=kubernetes
systemctl enable kubelet
ps: 由于官网未开放同步方式, 可能会有索引gpg检查失败的情况, 这时请用 yum install -y --nogpgcheck kubelet kubeadm kubectl 安装
将 etcd 证书复制到各master 节点
mkdir -p /etc/kubernetes/pki/etcd/

# 将 etcd 集群的证书拷贝到 k8s 集群服务器上
scp -r /data/etcd/ssl root@172.21.16.14:

# 在 master 节点上将 etcd 证书拷贝到 kubernetes 目录
# etcd集群的ca证书
cp ~/ca.pem /etc/kubernetes/pki/etcd/
# etcd集群的client证书,apiserver访问etcd使用
cp ~/ssl/client.pem /etc/kubernetes/pki/apiserver-etcd-client.pem
# etcd集群的client私钥
cp ~/ssl/client-key.pem /etc/kubernetes/pki/apiserver-etcd-client-key.pem
确保
tree /etc/kubernetes/pki/
/etc/kubernetes/pki/
├── apiserver-etcd-client-key.pem
├── apiserver-etcd-client.pem
└── etcd
    └── ca.pem
创建配置文件
kubeadm config print init-defaults > kubeadm-config.yaml
修改初始化配置文件
cat kubeadm-config.yaml
apiVersion: kubeadm.k8s.io/v1beta3
bootstrapTokens:
- groups:
  - system:bootstrappers:kubeadm:default-node-token
  token: abcdef.0123456789abcdef
  ttl: 24h0m0s
  usages:
  - signing
  - authentication
kind: InitConfiguration
localAPIEndpoint:
  advertiseAddress: 10.0.8.6   # 本机IP
  bindPort: 6443
nodeRegistration:
  criSocket: /var/run/dockershim.sock
  imagePullPolicy: IfNotPresent
  name: worker1  # 本主机名
  taints: null
---
apiServer:
  timeoutForControlPlane: 4m0s
apiVersion: kubeadm.k8s.io/v1beta3
certificatesDir: /etc/kubernetes/pki
clusterName: kubernetes
controlPlaneEndpoint: "10.0.8.100:16443"  # 虚拟IP和 HAPROXY 端口
controllerManager: {}
dns: {}
etcd:
  # local:
  #   dataDir: /var/lib/etcd
  external:
    endpoints:
    - https://172.21.16.14:2379
    - https://172.21.16.6:2379
    - https://172.21.16.13:2379
    caFile: /etc/kubernetes/pki/etcd/ca.pem # 搭建etcd集群时生成的ca证书
    certFile: /etc/kubernetes/pki/apiserver-etcd-client.pem # 搭建etcd集群时生成的客户端证书
    keyFile: /etc/kubernetes/pki/apiserver-etcd-client-key.pem # 搭建etcd集群时生成的客户端密钥
imageRepository: k8s.gcr.io
kind: ClusterConfiguration
kubernetesVersion: 1.22.0   # K8S 版本
networking:
  dnsDomain: cluster.local
  podSubnet: 10.97.0.0/16
  serviceSubnet: 10.96.0.0/16
scheduler: {}
kubeProxy:
  config:
    mode: "ipvs"
---
kind: KubeletConfiguration
apiVersion: kubelet.config.k8s.io/v1beta1
cgroupDriver: systemd
查看所需镜像
kubeadm config images pull --config kubeadm-config.yaml
初始化集群
kubeadm init --config kubeadm-config.yaml
在其它master节点创建以下目录
mkdir -p /etc/kubernetes/pki/etcd
把主master节点证书分别复制到从master节点
scp /etc/kubernetes/pki/ca.* root@10.0.8.12:/etc/kubernetes/pki/
scp /etc/kubernetes/pki/sa.* root@10.0.8.12:/etc/kubernetes/pki/
scp /etc/kubernetes/pki/front-proxy-ca.* root@10.0.8.12:/etc/kubernetes/pki/
scp /etc/kubernetes/admin.conf root@10.0.8.12:/etc/kubernetes/
scp /etc/kubernetes/pki/apiserver-kubelet-client.* root@10.0.8.12:/etc/kubernetes/pki/
其他master节点加入集群执行以下命令
kubeadm join 10.0.8.100:16443 --token abcdef.0123456789abcdef --discovery-token-ca-cert-hash sha256:d1ee5dafdcd86e308cf363e207abd6421cae4ac0d9119fe7b22aa05158432421 --control-plane
所有master节点执行以下命令
echo "export KUBECONFIG=/etc/kubernetes/admin.conf" >> ~/.bashrc
source ~/.bashrc
安装网络插件 flannel
下载
wget https://raw.githubusercontent.com/coreos/flannel/master/Documentation/kube-flannel.yml
修改配置
net-conf.json: |
    {
      "Network": "10.97.0.0/16",
      "Backend": {
        "Type": "vxlan"
      }
    }
安装
kubectl apply -f flannel.yaml
安装 kube-prometheus
todo
踩坑分享
修改 kubelet 从group-driver 为 systemd
Note: In v1.22, if the user is not setting the cgroupDriver field under KubeletConfiguration, kubeadm will default it to systemd.
# kubeadm-config.yaml
kind: ClusterConfiguration
apiVersion: kubeadm.k8s.io/v1beta3
kubernetesVersion: v1.21.0
---
kind: KubeletConfiguration
apiVersion: kubelet.config.k8s.io/v1beta1
cgroupDriver: systemd
开启tcp_tw_recycle内核参数在NAT环境会丢包
原因
tcp_tw_recycle参数。它用来快速回收TIME_WAIT连接,不过如果在NAT环境下会引发问题。 RFC1323中有如下一段描述:
An additional mechanism could be added to the TCP, a per-host cache of the last timestamp received from any connection. This value could then be used in the PAWS mechanism to reject old duplicate segments from earlier incarnations of the connection, if the timestamp clock can be guaranteed to have ticked at least once since the old connection was open. This would require that the TIME-WAIT delay plus the RTT together must be at least one tick of the sender’s timestamp clock. Such an extension is not part of the proposal of this RFC.
大概意思是说TCP有一种行为,可以缓存每个连接最新的时间戳,后续请求中如果时间戳小于缓存的时间戳,即视为无效,相应的数据包会被丢弃。
Linux是否启用这种行为取决于tcp_timestamps和tcp_tw_recycle,因为tcp_timestamps缺省就是开启的,所以当tcp_tw_recycle被开启后,实际上这种行为就被激活了,当客户端或服务端以NAT方式构建的时候就可能出现问题,下面以客户端NAT为例来说明:
当多个客户端通过NAT方式联网并与服务端交互时,服务端看到的是同一个IP,也就是说对服务端而言这些客户端实际上等同于一个,可惜由于这些客户端的时间戳可能存在差异,于是乎从服务端的视角看,便可能出现时间戳错乱的现象,进而直接导致时间戳小的数据包被丢弃。如果发生了此类问题,具体的表现通常是是客户端明明发送的SYN,但服务端就是不响应ACK。
在4.12之后的内核已移除tcp_tw_recycle内核参数: https://git.kernel.org/pub/scm/linux/kernel/git/torvalds/linux.git/commit/?id=4396e46187ca5070219b81773c4e65088dac50cchttps://github.com/torvalds/linux/commit/4396e46187ca5070219b81773c4e65088dac50cc
相关参考
https://github.com/kubernetes/kubernetes/blob/master/pkg/proxy/ipvs/README.md